Brownies have a way of capturing our hearts and taste buds. There’s something magical about the rich, fudgy texture of a gourmet vegan brownie that has you craving that sweet, dark chocolate indulgence. As we dive deep into the world of brownie photography food styling, many of us are just looking for ways to elevate our dessert game. Whether you’re a food blogger, an aspiring photographer, or simply someone who loves to showcase their culinary creations on social media, this post is for you.
If you’re someone who appreciates moody food photography and the art of dessert styling, you’ll find these brownie photography food styling ideas incredibly inspiring. The right presentation can make your brownies not just a treat for the taste buds but a feast for the eyes as well. I’ve compiled 16 unique ideas that are dark, captivating, and perfect for enhancing the appeal of your brownies. From textured backdrops to creative garnishes, you will discover ways to create stunning visuals that will make your audience drool.
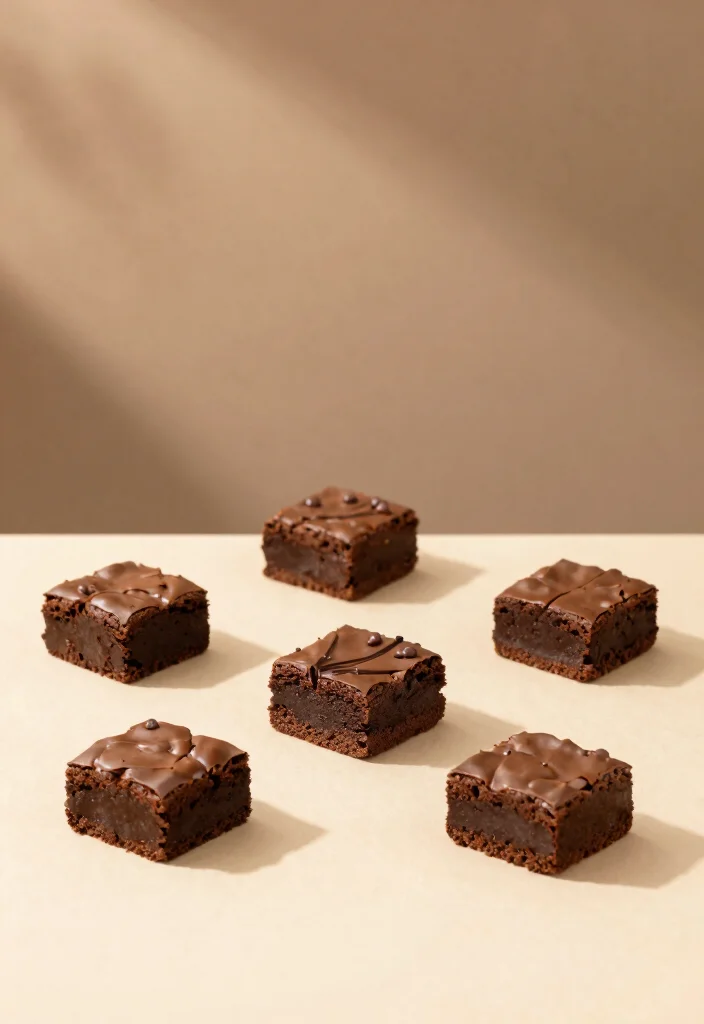
Get ready to explore ways to transform your brownie presentations into something truly special. You’ll learn valuable techniques and creative tips that you can easily implement. By the end of this post, you’ll be well-equipped to elevate your brownie photography and make your dessert styling stand out in a crowd of ordinary sweet treats.
Key Takeaways
– Explore the use of textured backdrops to create depth and interest in your brownie photos.
– Learn how dark chocolate drizzles can enhance the richness of your desserts and add an artistic touch.
– Layering with fruits adds a pop of color while complementing the flavors of your brownies.
– Incorporate shadows and light play to create a moody aesthetic that highlights the allure of your brownies.
– Use unique serving styles and decorative plates to elevate the overall presentation of your chocolate desserts.
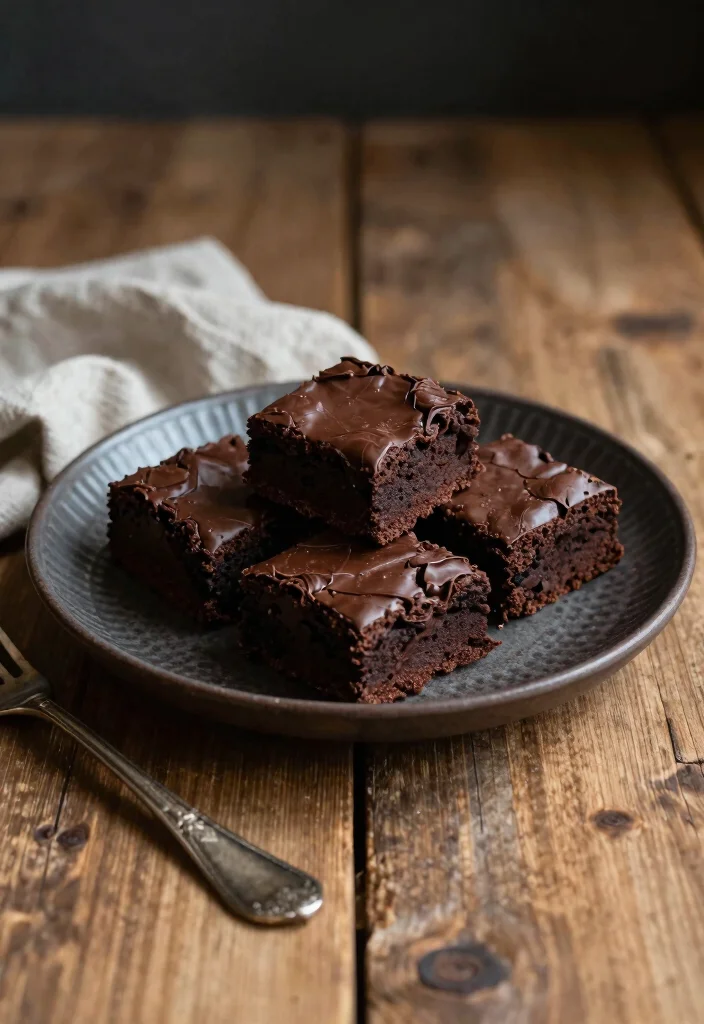
1. Textured Backdrops
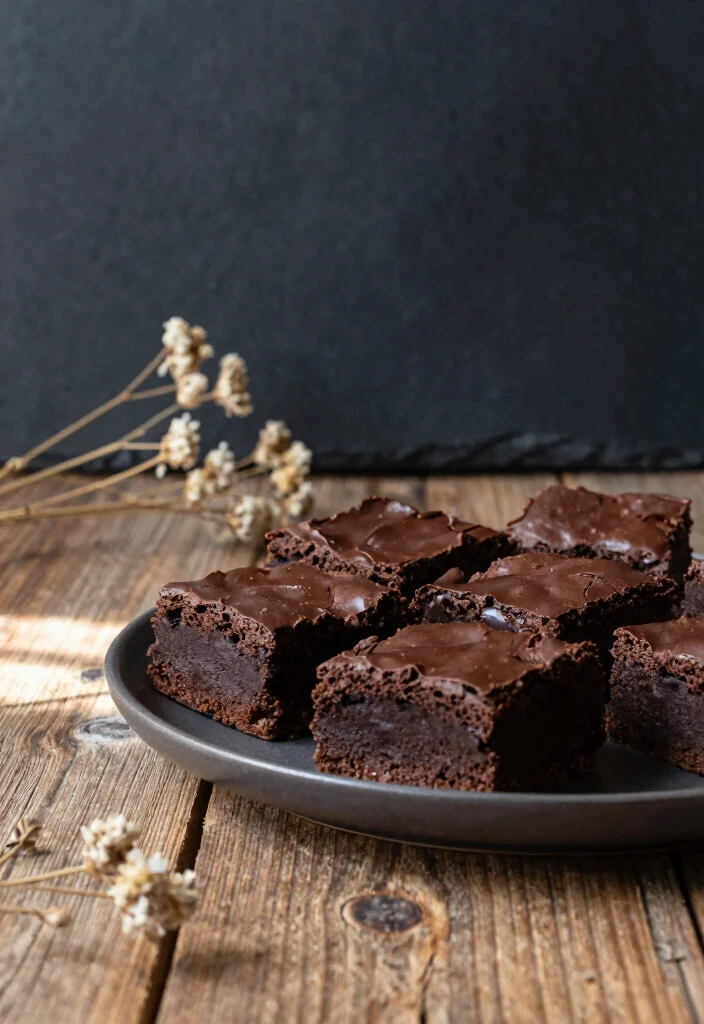
Are you looking to elevate your brownie photography? Textured backdrops can add a stunning visual element to your shots. Dark surfaces like slate tiles or rustic wood can highlight the rich, velvety tones of your brownies, creating depth and interest in your composition.
These textures allow light to play beautifully across the brownies, emphasizing their shiny glazes without overwhelming the scene. Feel free to mix and match different materials, like crumpled dark fabrics or rough-hewn wood, to find the perfect backdrop that complements your delicious creations.
– Tip: Position your light source to the side for dramatic shadows that enhance the moody vibe.
– Unique Insight: Layering various textured items can yield dynamic, eye-catching backgrounds.
– Props: Incorporate natural elements such as dried flowers or sprigs of herbs to enrich the setting.
Recipe Overview:
– Servings: 12
– Prep Time: 15 minutes
– Cook Time: 30 minutes
– Total Time: 45 minutes
– Calories: Approx. 200 per brownie.
Nutrition Information:
– Calories: 200
– Protein: 3g
– Carbohydrates: 30g
– Fat: 9g
Ingredients:
– 1 cup almond flour
– 1/2 cup cocoa powder
– 1/4 cup maple syrup
– 1/4 cup coconut oil (melted)
– 1 teaspoon vanilla extract
– 1/4 teaspoon salt
Instructions:
1. Preheat the oven to 350°F (175°C).
2. In a mixing bowl, combine almond flour, cocoa powder, and salt.
3. Add maple syrup, melted coconut oil, and vanilla extract; mix until smooth.
4. Pour into a greased baking pan and bake for 25-30 minutes.
5. Let cool before cutting into squares.
Serve with a scoop of vegan ice cream for an indulgent touch.
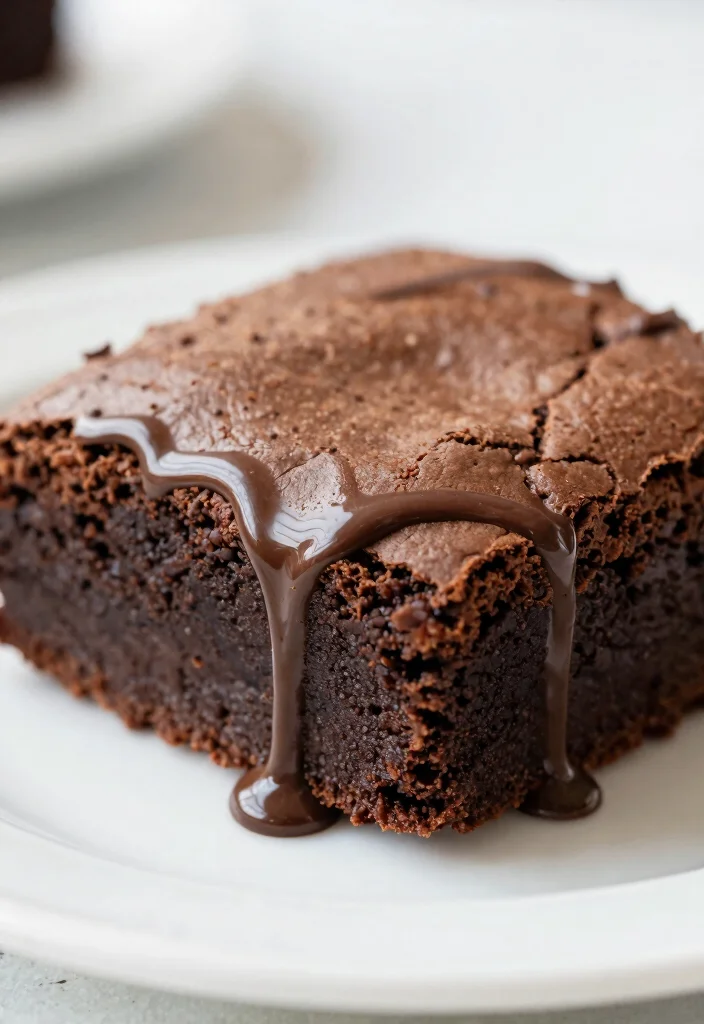
2. Dark Chocolate Drizzle
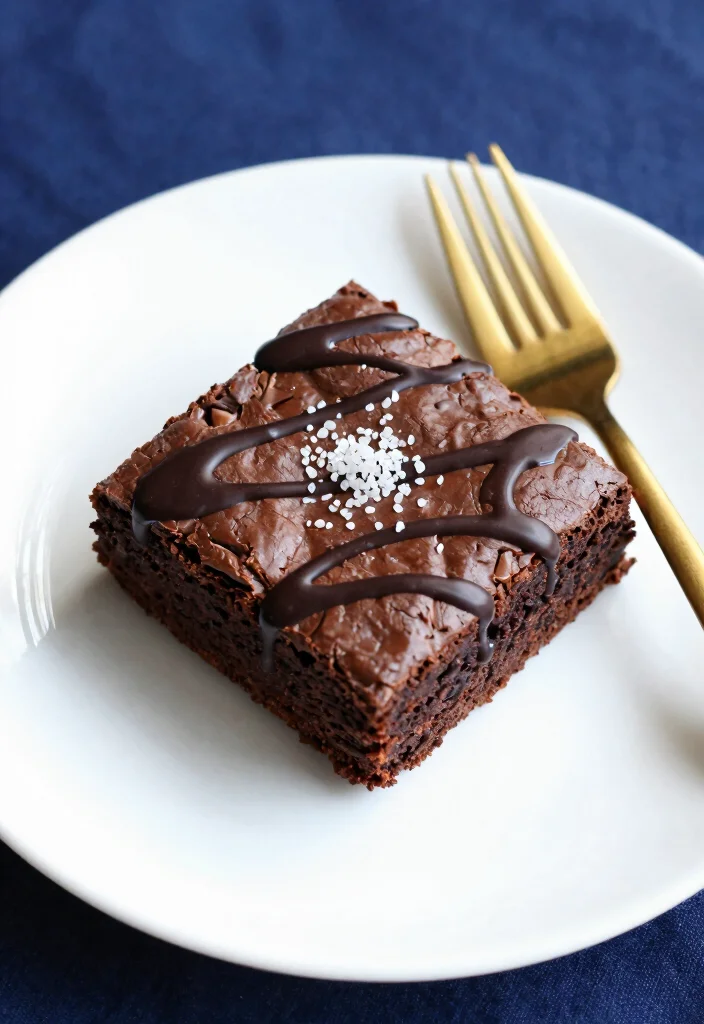
Ready to take your brownie presentation up a notch? A rich dark chocolate drizzle adds a decadent flair that elevates your dessert. This simple technique not only enhances the brownie’s visual appeal but also highlights its luscious texture.
To achieve the drizzle, melt some high-quality dark chocolate and use a piping bag or spoon to create beautiful patterns over your brownies. The contrast between the dark drizzle and the brownies creates a stunning visual effect. For an extra kick, sprinkle a hint of sea salt or some crushed nuts on top for added texture and flavor.
– Tip: Select a plate in a contrasting color to make your brownies stand out even more.
– Unique Insight: Mixing a bit of coconut oil with the chocolate can give your drizzle a glossy finish.
– Props: A golden fork can add a touch of elegance to your presentation.
Recipe Overview:
– Servings: 10
– Prep Time: 10 minutes
– Cook Time: 30 minutes
– Total Time: 40 minutes
– Calories: Approx. 220 per brownie.
Nutrition Information:
– Calories: 220
– Protein: 4g
– Carbohydrates: 32g
– Fat: 10g
Ingredients:
– 1 cup gluten-free flour
– 1/2 cup cocoa powder
– 1/2 cup dark chocolate (for drizzle)
– 1/2 cup agave syrup
– 1/4 cup almond milk
– 1/4 teaspoon salt
Instructions:
1. Preheat the oven to 350°F (175°C) and line a baking pan with parchment paper.
2. Mix the dry ingredients in a bowl.
3. Stir in agave syrup and almond milk until combined.
4. Pour into the pan and bake for 25-30 minutes.
5. Once cooled, melt dark chocolate and drizzle it over the brownies.
Use a fork to create fun designs with the drizzle.
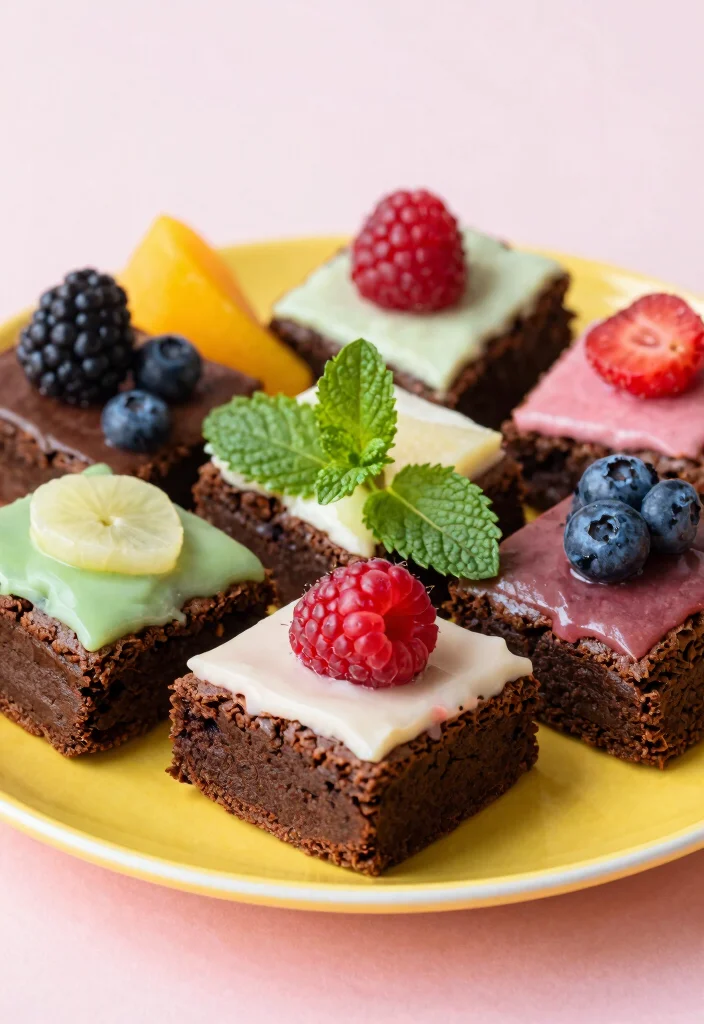
3. Layering with Fruits
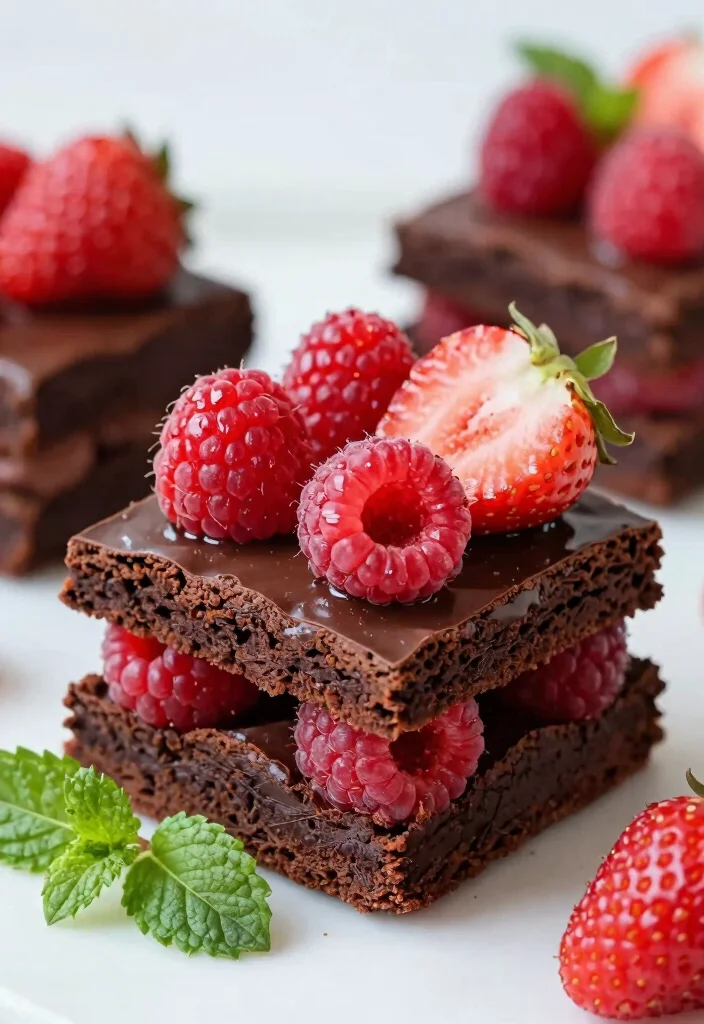
Craving something vibrant and fresh? Layering your brownies with fruits adds a splash of color and a burst of flavor to your photography. Bright berries like raspberries or strawberries perfectly complement the deep chocolate taste, making your brownies even more enticing.
Arrange the fruits on top of your brownies or create a side arrangement. The vivid colors of the fruit contrast beautifully with the dark chocolate, drawing the eye and enhancing the overall presentation. Don’t hesitate to try different fruits to discover your ideal flavor pairings.
– Tip: Fresh fruits will ensure a lively look and taste.
– Unique Insight: A light drizzle of lemon juice over sliced fruits can make their colors pop even more.
– Props: Fresh mint leaves add a nice touch of green and freshness.
Recipe Overview:
– Servings: 8
– Prep Time: 10 minutes
– Cook Time: 30 minutes
– Total Time: 40 minutes
– Calories: Approx. 250 per serving.
Nutrition Information:
– Calories: 250
– Protein: 5g
– Carbohydrates: 35g
– Fat: 12g
Ingredients:
– 1 cup buckwheat flour
– 1/2 cup cocoa powder
– 1/2 cup dates (pitted)
– 1/4 cup coconut sugar
– 1/4 cup almond milk
– Assorted fresh fruits for layering.
Instructions:
1. Preheat the oven to 350°F (175°C).
2. Blend dates and almond milk until smooth.
3. Mix flour, cocoa powder, and sugar in a bowl; add the date mixture.
4. Stir until well combined and pour into a greased pan.
5. Bake for 25-30 minutes. Cool and layer with fruits of your choice.
Choose fruits that are in season for the best flavor.
4. Decorative Plates and Cutlery
Want to impress with your brownie presentation? The right choice of plate and cutlery can dramatically enhance your food styling. Opt for rustic or vintage-style plates that add character and charm to your brownie display.
Dark, textured plates can emphasize the richness of the brownies, blending beautifully with the overall moody aesthetic. Pair your brownies with simple yet elegant cutlery that complements without overshadowing your dish. A thoughtfully styled setting can transform a basic brownie into a gourmet delight, enticing your audience to engage with your photography.
– Tip: For a more impactful presentation, use contrasting colors for your plates and cutlery.
– Unique Insight: A vintage fork can evoke nostalgia, perfectly matching rich desserts.
– Props: Simple napkins can elevate the scene without distracting from the brownies.
Recipe Overview:
– Servings: 16
– Prep Time: 15 minutes
– Cook Time: 25 minutes
– Total Time: 40 minutes
– Calories: Approx. 200 per brownie.
Nutrition Information:
– Calories: 200
– Protein: 4g
– Carbohydrates: 30g
– Fat: 8g
Ingredients:
– 1 1/2 cups almond flour
– 1 cup cocoa powder
– 1 cup maple syrup
– 1/2 cup almond butter
– 1 tsp baking powder
Instructions:
1. Preheat the oven to 350°F (175°C).
2. In a bowl, combine all dry ingredients.
3. In another bowl, mix wet ingredients and then combine both mixtures.
4. Pour into greased pans and bake for 25-30 minutes.
5. Allow to cool, then serve on decorative plates with elegant cutlery.
Use natural lighting to highlight the textures and colors.
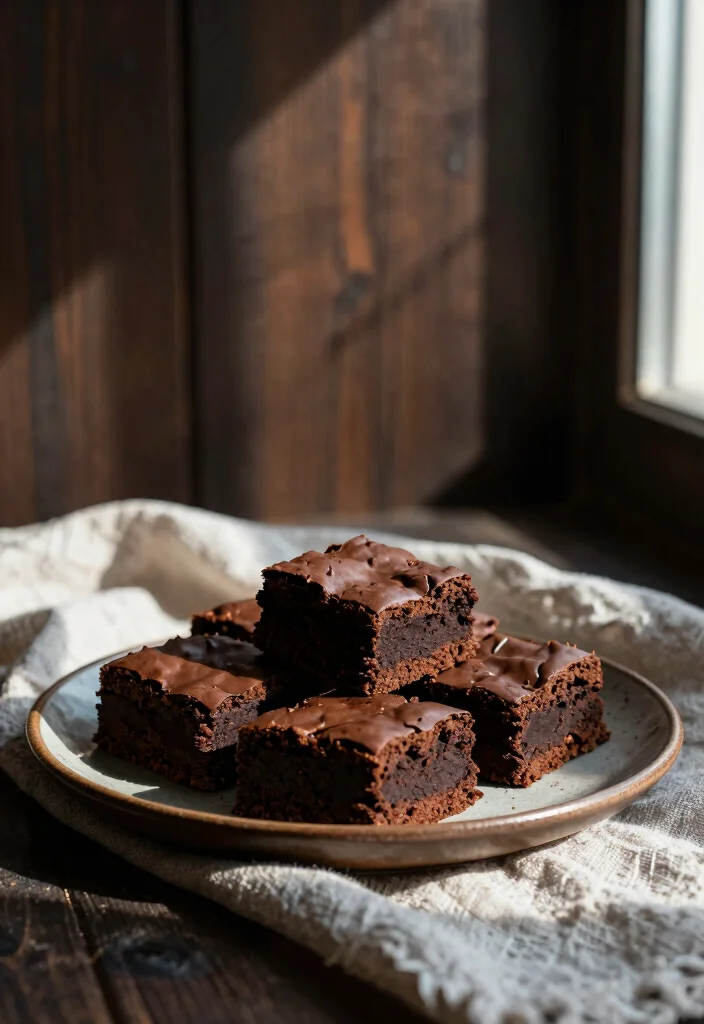
5. Minimalist Aesthetic
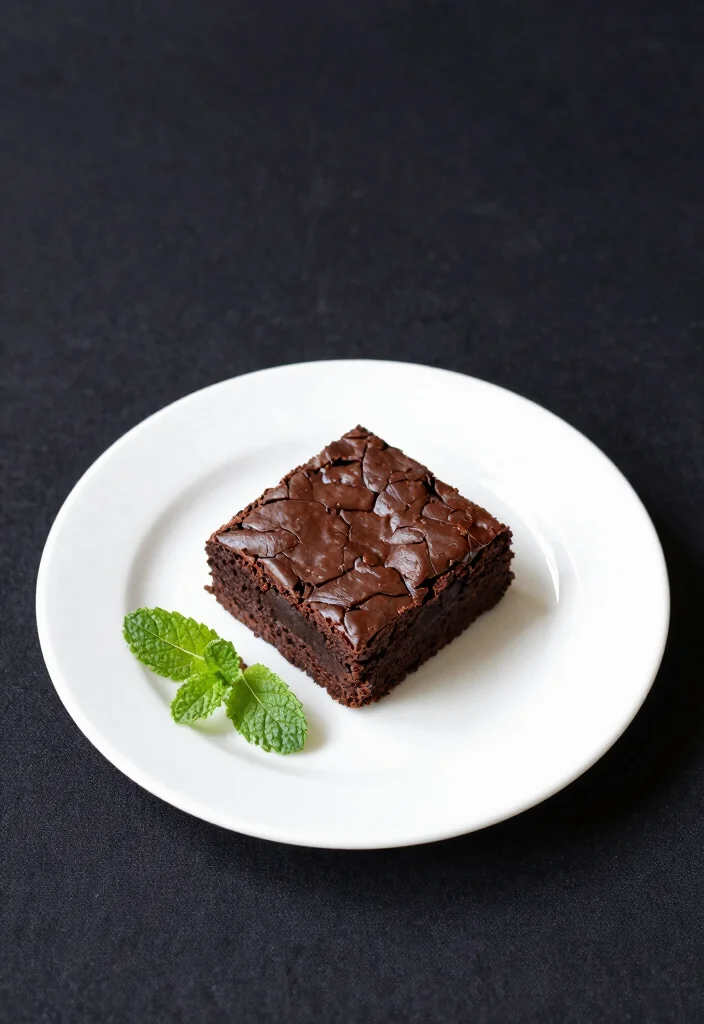
Do you believe in the power of simplicity? A minimalist aesthetic can truly showcase the beauty of your brownies without distractions. Keeping props and backgrounds simple allows your brownies to take center stage, making them the star of the show.
A plain dark backdrop paired with a single brownie can create a striking image, emphasizing its texture and color. This approach invites viewers to appreciate the craftsmanship of each brownie bite, focusing entirely on the delicious dessert itself.
– Tip: Use negative space to make your brownie really pop.
– Unique Insight: Experimenting with shadows can add depth without cluttering your image.
– Props: A single flower or herb sprig can add elegance without overwhelming the scene.
Recipe Overview:
– Servings: 8
– Prep Time: 10 minutes
– Cook Time: 20 minutes
– Total Time: 30 minutes
– Calories: Approx. 180 per brownie.
Nutrition Information:
– Calories: 180
– Protein: 3g
– Carbohydrates: 28g
– Fat: 7g
Ingredients:
– 1 cup coconut flour
– 1/2 cup cocoa powder
– 1/4 cup agave syrup
– 1/2 cup unsweetened applesauce
– 1 teaspoon vanilla extract
Instructions:
1. Preheat the oven to 350°F (175°C).
2. Mix flour, cocoa, and agave in a bowl.
3. Add applesauce and vanilla; stir until smooth.
4. Pour into a greased pan and bake for 20-25 minutes.
5. Allow to cool before slicing and plating.
Keep plates simple to let brownies shine.
Fun fact: in brownie photography food styling, a single brownie on a plain dark backdrop can boost focus by about 70%—simplicity lets texture shine. Keep props minimal and watch your brownie become the star of the frame.
6. Creative Layering
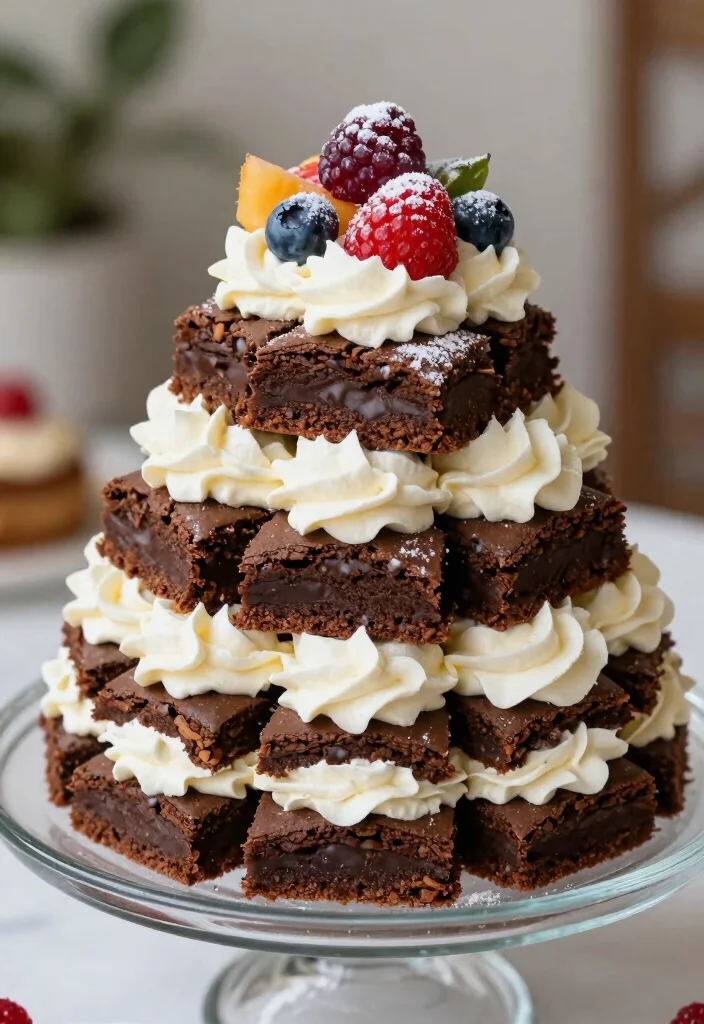
Looking to add some flair to your brownie photography? Creative layering can elevate your shots by introducing depth and complexity. Stack brownies with various textures or flavors, like a brownie topped with whipped coconut cream, to create a decadent dessert tower.
Layering not only enhances the visual appeal but also delights the taste buds, showcasing the different flavors within your brownies. Drizzle with sauce or a dusting of powdered sugar for that extra touch. Experiment with heights and angles to create captivating images.
– Tip: Use a clear glass or acrylic dish to showcase each layer beautifully.
– Unique Insight: Adding fruits or nuts between layers can create delightful textures.
– Props: A simple cake stand can elevate the presentation further.
Recipe Overview:
– Servings: 6
– Prep Time: 15 minutes
– Cook Time: 25 minutes
– Total Time: 40 minutes
– Calories: Approx. 275 per serving.
Nutrition Information:
– Calories: 275
– Protein: 5g
– Carbohydrates: 40g
– Fat: 13g
Ingredients:
– 1 cup dark chocolate chips
– 1 cup almond flour
– 1/2 cup maple syrup
– 2 tablespoons coconut flour
– 1/2 cup whipped coconut cream.
Instructions:
1. Preheat the oven to 350°F (175°C).
2. Melt dark chocolate and mix with almond flour and coconut flour.
3. Stir in maple syrup until well combined.
4. Pour into greased baking dish and bake for 25 minutes.
5. Layer with whipped coconut cream and another brownie layer.
Use a piping bag for the whipped cream for neat layers.
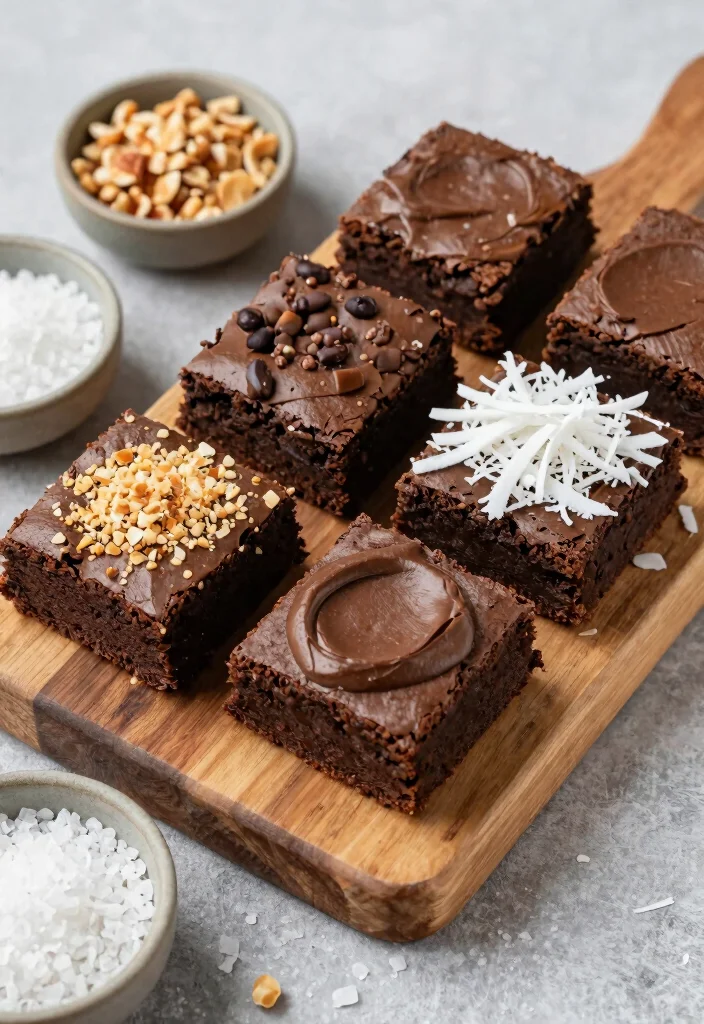
7. Moorish Chocolate Garnishes
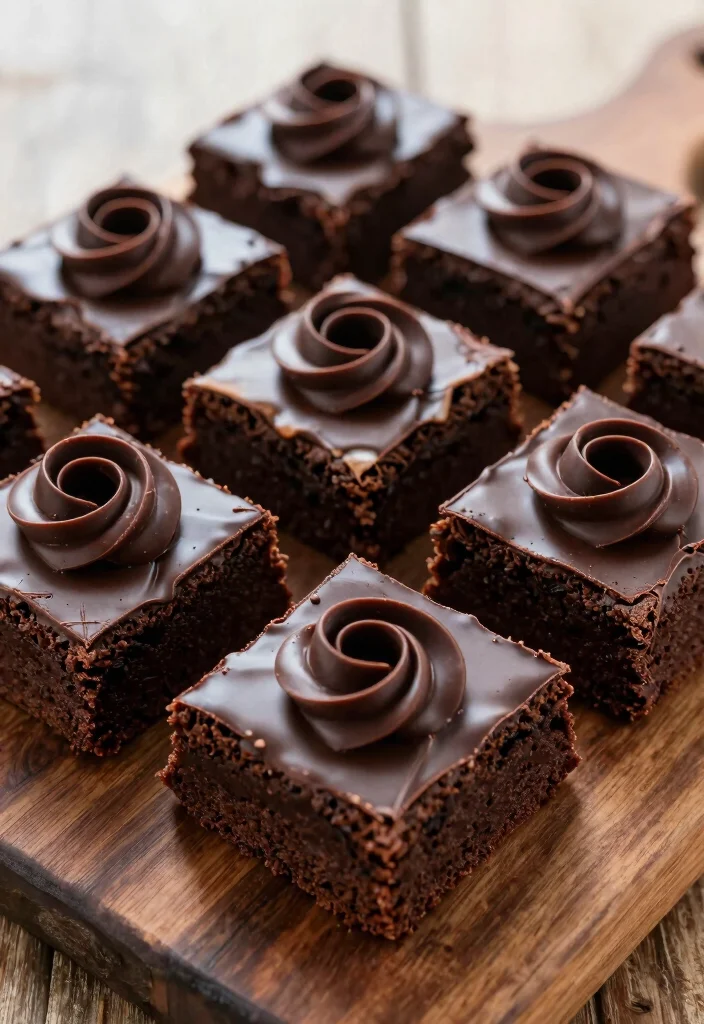
Want to impress your audience with your brownie presentation? Adding moorish chocolate garnishes can take your brownie photography to another level. Create artistic chocolate decorations using melted chocolate and a piping bag, forming delicate curls or intricate designs on top of your brownies.
These garnishes not only add visual interest but also enhance the chocolatey flavor of the brownies. Play with different shapes and designs to draw attention to your dish while maintaining a cohesive overall presentation.
– Tip: High-quality chocolate will yield more defined shapes.
– Unique Insight: Incorporate contrasting flavors, like chili flakes, for an unexpected spicy twist.
– Props: A small brush can help add intricate details to your chocolate garnishes.
Recipe Overview:
– Servings: 12
– Prep Time: 10 minutes
– Cook Time: 30 minutes
– Total Time: 40 minutes
– Calories: Approx. 210 per brownie.
Nutrition Information:
– Calories: 210
– Protein: 4g
– Carbohydrates: 31g
– Fat: 9g
Ingredients:
– 1 cup hazelnut flour
– 1/2 cup cocoa powder
– 1/2 cup agave syrup
– 1/4 cup melted coconut oil
– 1/4 cup dark chocolate (for garnishes).
Instructions:
1. Preheat the oven to 350°F (175°C).
2. Mix flour, cocoa powder, agave, and coconut oil in a bowl.
3. Pour into a greased pan and bake for 25-30 minutes.
4. For garnishes, melt dark chocolate and pipe designs onto cooled brownies.
Allow the chocolate to cool for precise shapes.
Moorish chocolate garnishes let your brownie photography shine—easy to master with melted chocolate and a piping bag. Practice simple curls and delicate designs to elevate your brownie food styling and make your desserts Instagram-worthy.
How To Choose the Right Brownie Photography Food Styling Elements
When it comes to brownie photography, the right styling choices can elevate your images from ordinary to stunning. Here are some key elements to consider when selecting your food styling components for that perfect dark moody aesthetic.
1. Color Palette:
Choose a color palette that complements your brownies. Deep, rich colors like dark browns, blacks, and pops of gold or deep green work beautifully. Avoid overly bright colors which can detract from the moody aesthetic. Stick with earthy tones that enhance the allure of dark chocolate desserts.
2. Textures:
Incorporate a mix of textures to create depth in your images. Use rough, rustic surfaces like wood or stone for your backdrop. Pair this with smooth, glossy brownie layers and rough garnishes like crushed nuts or coarse sea salt. The contrast between these textures captivates the viewer’s eye and adds interest.
3. Props and Accessories:
Select props that align with your styling theme. Decorative plates, vintage cutlery, and cloth napkins in muted colors can enhance your brownies without stealing the spotlight. Make sure your props resonate with the overall vibe you want to portray, whether it’s rustic or elegant.
4. Lighting:
Natural light is your best friend when capturing moody food photography. Position your setup near a window for soft, diffused lighting. To create shadows and highlights, try using a reflector or a piece of black foam board to manipulate light. This play of light and shadow can dramatically enhance the look of your brownies.
5. Composition Techniques:
Pay attention to composition. Use the rule of thirds to position your brownies attractively within the frame. Consider layering elements; for example, place a stack of brownies next to a small bowl of berries or a drizzle of chocolate. This creates a visually appealing scene that draws the viewer in.
6. Garnishes:
Choose garnishes thoughtfully. Use fresh fruits, edible flowers, or a dusting of powdered sugar for pops of color. Just a little goes a long way in creating that moody aesthetic. Avoid cluttering the scene; instead, let your brownies be the hero of the shot.
Pro Tip: Test different angles and distances in your shots. Sometimes, the best perspective for brownie photography is from above or at a slight angle. Experiment to find what showcases your creations best, capturing the luscious layers and textures that make your brownies irresistible.
By following these guidelines, you can create beautiful brownie photography food styling that not only highlights the rich, decadent nature of your dark chocolate desserts but also embodies the moody aesthetic that makes your images truly stand out. Happy styling!
8. Incorporating Textures
Textures play a crucial role in food photography. Want to create a more engaging visual story? Incorporating different textures into your brownie setup can make a significant difference. Consider adding crushed nuts, flaky sea salt, or coconut shavings to bring layers of texture to life.
These elements not only enhance the aesthetic appeal of your brownies but also evoke curiosity in viewers. Mixing contrasting textures elevates your images, making them feel more dynamic and delicious.
– Tip: Play with contrasting textures to make your brownies truly stand out.
– Unique Insight: Crushed cookies or graham crackers can introduce a delightful twist.
– Props: Include small bowls filled with different toppings to add depth in your photos.
Recipe Overview:
– Servings: 12
– Prep Time: 15 minutes
– Cook Time: 30 minutes
– Total Time: 45 minutes
– Calories: Approx. 220 per serving.
Nutrition Information:
– Calories: 220
– Protein: 3g
– Carbohydrates: 32g
– Fat: 10g
Ingredients:
– 1 cup spelt flour
– 1/2 cup cocoa powder
– 1/2 cup coconut sugar
– 1/2 cup almond milk
– Toppings like sea salt or nuts.
Instructions:
1. Preheat the oven to 350°F (175°C).
2. Mix dry ingredients in a bowl.
3. Stir in almond milk until a thick batter forms.
4. Pour into a greased pan and bake for 25-30 minutes.
5. Once cool, add toppings and textured elements for styling.
Consider different angles to showcase the texture in your images.
9. Shadows and Light Play
Ready to master the art of moody food photography? Understanding shadows and light play is critical. Use different light sources to create dramatic shadows that enhance the richness of your brownies.
Position your brownies near a window during the golden hour to capture enchanting light patterns that highlight their textures and flavors. Experiment with various lighting angles to discover what works best for your specific setup, revealing the full depth of your dishes.
– Tip: Use reflectors to bounce light and soften harsh shadows.
– Unique Insight: Experiment with shooting at different times of the day to see how it impacts your images.
– Props: Light-diffusing curtains can help achieve the perfect lighting setup.
Recipe Overview:
– Servings: 12
– Prep Time: 10 minutes
– Cook Time: 30 minutes
– Total Time: 40 minutes
– Calories: Approx. 230 per brownie.
Nutrition Information:
– Calories: 230
– Protein: 4g
– Carbohydrates: 34g
– Fat: 10g
Ingredients:
– 1 cup black bean puree
– 1/2 cup cocoa powder
– 1/4 cup maple syrup
– 1/4 cup coconut oil
– 1 teaspoon vanilla.
Instructions:
1. Preheat the oven to 350°F (175°C).
2. Blend black beans until smooth.
3. In a bowl, mix cocoa powder, syrup, and oil with black bean puree.
4. Pour into a greased pan and bake for 25-30 minutes.
5. Allow to cool before styling with light play.
Use a tripod for stability during long exposures.
10. Shimmering Sugar Dusting
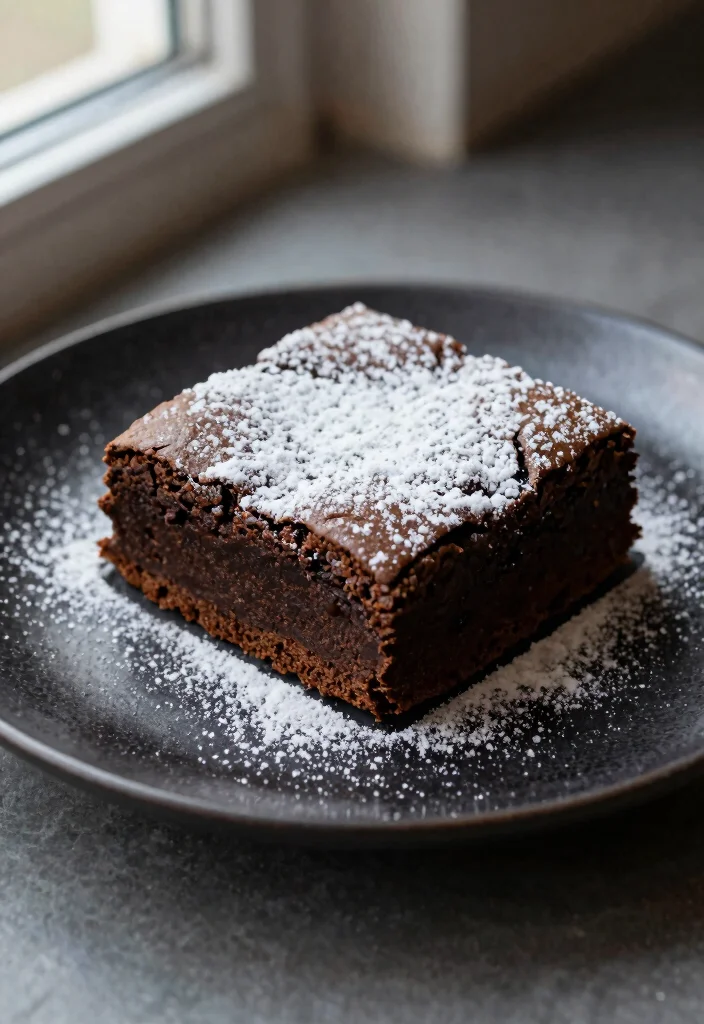
Want to add a touch of elegance to your brownies? A light dusting of shimmering powdered sugar can create a stunning visual effect that elevates your presentation. This simple yet effective technique adds refinement, making your brownies look more enticing.
Sprinkle powdered sugar over the brownies just before snapping your shots. The sugar reflects light beautifully, creating a magical shimmer that draws in viewers. Pairing this with a contrasting dark background amplifies the effect, making your brownies truly pop.
– Tip: Sift the sugar for even distribution.
– Unique Insight: Mixing cocoa powder with the sugar can add depth to the appearance.
– Props: A fine mesh sieve is ideal for achieving a delicate dusting effect.
Recipe Overview:
– Servings: 10
– Prep Time: 15 minutes
– Cook Time: 25 minutes
– Total Time: 40 minutes
– Calories: Approx. 190 per brownie.
Nutrition Information:
– Calories: 190
– Protein: 3g
– Carbohydrates: 28g
– Fat: 8g
Ingredients:
– 1 cup oat flour
– 1/2 cup cocoa powder
– 1/2 cup maple syrup
– 1/2 cup almond milk
– Powdered sugar for dusting.
Instructions:
1. Preheat the oven to 350°F (175°C).
2. Combine all ingredients in a bowl until smooth.
3. Pour into a greased pan and bake for 25 minutes.
4. Allow brownies to cool before sifting powdered sugar on top.
Use a light hand to create a delicate dusting effect.
11. Flavor Infusions

Craving something unique? Infusing different flavors into your brownies can create intriguing variations that stand out in your photography. Consider adding spices like cinnamon or chili powder, or even infusing the batter with brewed espresso for a depth of flavor.
These flavor additions not only tantalize taste buds but also provide visual styling opportunities. Each infusion can be represented visually through accompanying garnishes or decor elements that tie back to the flavor, making your photography even more engaging.
– Tip: Use natural ingredients for flavor infusions to keep your brownies vegan-friendly.
– Unique Insight: Pair flavor-infused brownies with complementary toppings for a cohesive presentation.
– Props: Small jars displaying spices or ingredients beside the brownies can enhance the visual storytelling.
Recipe Overview:
– Servings: 10
– Prep Time: 15 minutes
– Cook Time: 30 minutes
– Total Time: 45 minutes
– Calories: Approx. 200 per brownie.
Nutrition Information:
– Calories: 200
– Protein: 3g
– Carbohydrates: 30g
– Fat: 9g
Ingredients:
– 1 cup almond flour
– 1/2 cup cocoa powder
– 1/4 cup maple syrup
– 1/4 cup espresso (brewed)
– 1 teaspoon cinnamon.
Instructions:
1. Preheat the oven to 350°F (175°C).
2. Combine dry ingredients in a bowl.
3. Add brewed espresso and maple syrup; mix until smooth.
4. Pour into a greased pan and bake for 25-30 minutes.
5. Garnish with complementary spices on top for styling.
Always taste your batter before baking to adjust flavors.
Flavor infusions are your secret cast for brownie photography food styling—pinch of cinnamon or a bold espresso can tell a story before the first bite. Pair these twists with thoughtful garnishes to make your shots pop and invite a second look.
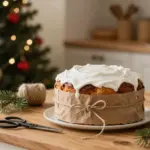
12. Seasonal Decor
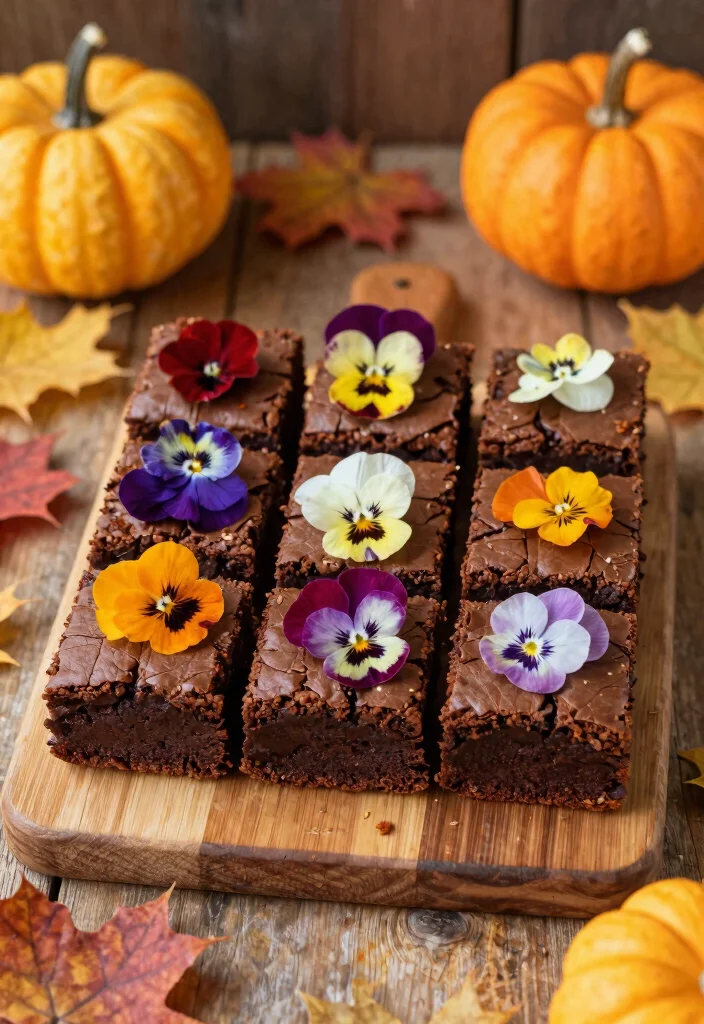
Want to breathe life into your brownie photography? Incorporating seasonal decor can enhance the visual storytelling. Whether it’s autumn leaves, festive holiday ornaments, or bright summer flowers, seasonal elements add context and vibrancy to your images.
Choose decor that complements your brownies without stealing the spotlight. These seasonal touches can evoke emotions and engage your audience, making your brownies even more enticing and relatable.
– Tip: Use seasonal colors to enrich the theme of your photography.
– Unique Insight: Edible flowers can make for beautiful and unique decorations.
– Props: Keep decor simple to maintain focus on the brownies themselves.
Recipe Overview:
– Servings: 12
– Prep Time: 15 minutes
– Cook Time: 25 minutes
– Total Time: 40 minutes
– Calories: Approx. 220 per brownie.
Nutrition Information:
– Calories: 220
– Protein: 4g
– Carbohydrates: 32g
– Fat: 10g
Ingredients:
– 1 cup whole wheat flour
– 1/2 cup cocoa powder
– 1/2 cup agave syrup
– 1/4 cup melted coconut oil
– Edible flowers for decoration.
Instructions:
1. Preheat the oven to 350°F (175°C).
2. Mix flour, cocoa powder, agave syrup, and coconut oil until well combined.
3. Pour into a greased baking dish and bake for 25-30 minutes.
4. Once cooled, decorate with edible flowers for a seasonal touch.
Always ensure that flowers are edible and pesticide-free.
13. Focus on Details
Want to capture the essence of your brownies? Zooming in on the details can create stunning and engaging images. Close-up shots can highlight the rich textures, gooey chocolate, and intricate toppings that make your brownies truly special.
Using a macro lens or a smartphone camera with a good zoom will allow you to focus on the finest details. Capturing the chewy texture or melting chocolate can create a mouth-watering effect that draws viewers in.
– Tip: Play with the depth of field to focus on specific areas of your brownies.
– Unique Insight: Capturing the moment of cutting a brownie can showcase the gooey inside beautifully.
– Props: Use a simple background to avoid distractions and emphasize the brownies.
Recipe Overview:
– Servings: 12
– Prep Time: 10 minutes
– Cook Time: 30 minutes
– Total Time: 40 minutes
– Calories: Approx. 210 per brownie.
Nutrition Information:
– Calories: 210
– Protein: 4g
– Carbohydrates: 30g
– Fat: 9g
Ingredients:
– 1 cup chickpea flour
– 1/2 cup cocoa powder
– 1/2 cup maple syrup
– 1/4 cup coconut oil.
Instructions:
1. Preheat the oven to 350°F (175°C).
2. Mix all the ingredients in a bowl until smooth.
3. Pour into a greased pan and bake for 25-30 minutes.
4. Allow to cool and then cut to capture close-up shots.
Use a tripod to stabilize your camera for close-up shots.
14. Layering Colors
Looking to brighten your brownie presentations? Layering colors can create visually stunning images. Use contrasting colored ingredients—like vibrant berries, fresh green mint, or bright sprinkles—to add depth and excitement to your photos.
These colorful additions not only enhance the appeal of the brownies but also create a lively visual experience. Consider the overall color palette and how different colors work together to create harmony while still attracting attention.
– Tip: Stick to a cohesive color scheme for a polished and professional look.
– Unique Insight: Experiment with dishes of different colors to add variety to your presentations.
– Props: Colorful napkins or tablecloths can complement the overall aesthetic beautifully.
Recipe Overview:
– Servings: 12
– Prep Time: 15 minutes
– Cook Time: 25 minutes
– Total Time: 40 minutes
– Calories: Approx. 220 per brownie.
Nutrition Information:
– Calories: 220
– Protein: 4g
– Carbohydrates: 32g
– Fat: 10g
Ingredients:
– 1 cup quinoa flour
– 1/2 cup cocoa powder
– 1/2 cup agave syrup
– 1/4 cup almond milk
– Colorful toppings like berries.
Instructions:
1. Preheat the oven to 350°F (175°C).
2. Mix all ingredients until smooth.
3. Pour into a greased pan and bake for 25-30 minutes.
4. Once cooled, decorate with colorful toppings for photography.
Choose toppings that are in season for the best flavor.
15. Intimate Settings
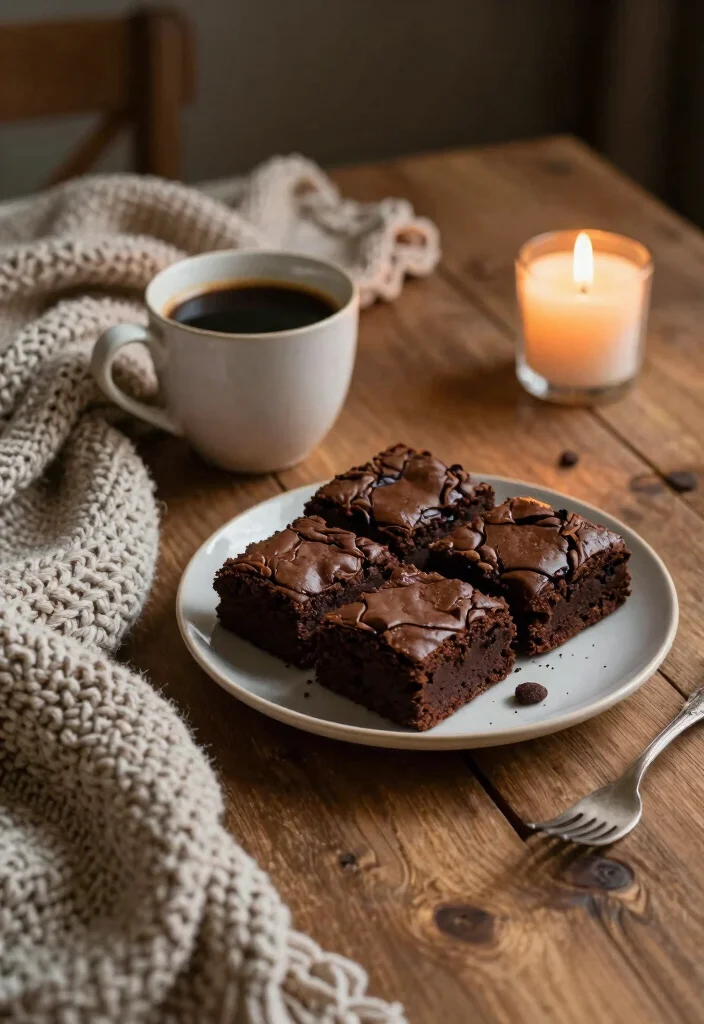
Want to evoke emotions in your brownie photography? Creating an intimate setting can connect viewers to your dish. Incorporate cozy elements like soft blankets, a warm cup of coffee, or gentle candlelight to craft a comforting atmosphere.
These settings not only enhance the mood of your photos but also encourage viewers to imagine enjoying the brownies in a warm and inviting space. By incorporating personal touches, you can elevate your brownie photography to new heights.
– Tip: Soft lighting helps create that cozy feel you want.
– Unique Insight: Use props that reflect your personal style to make the setting uniquely yours.
– Props: A knitted blanket or a rustic coffee cup can enhance the intimate vibe beautifully.
Recipe Overview:
– Servings: 8
– Prep Time: 15 minutes
– Cook Time: 25 minutes
– Total Time: 40 minutes
– Calories: Approx. 250 per brownie.
Nutrition Information:
– Calories: 250
– Protein: 5g
– Carbohydrates: 36g
– Fat: 12g
Ingredients:
– 1 cup whole wheat flour
– 1/2 cup cocoa powder
– 1/2 cup coconut sugar
– 1/4 cup almond milk
– A touch of cinnamon for flavor.
Instructions:
1. Preheat the oven to 350°F (175°C).
2. Combine all ingredients in a bowl until smooth.
3. Pour into a greased baking dish and bake for 25-30 minutes.
4. Arrange in a cozy setting with warm props for photography.
Use soft, diffused lighting to enhance the intimate atmosphere.
16. Unique Serving Styles
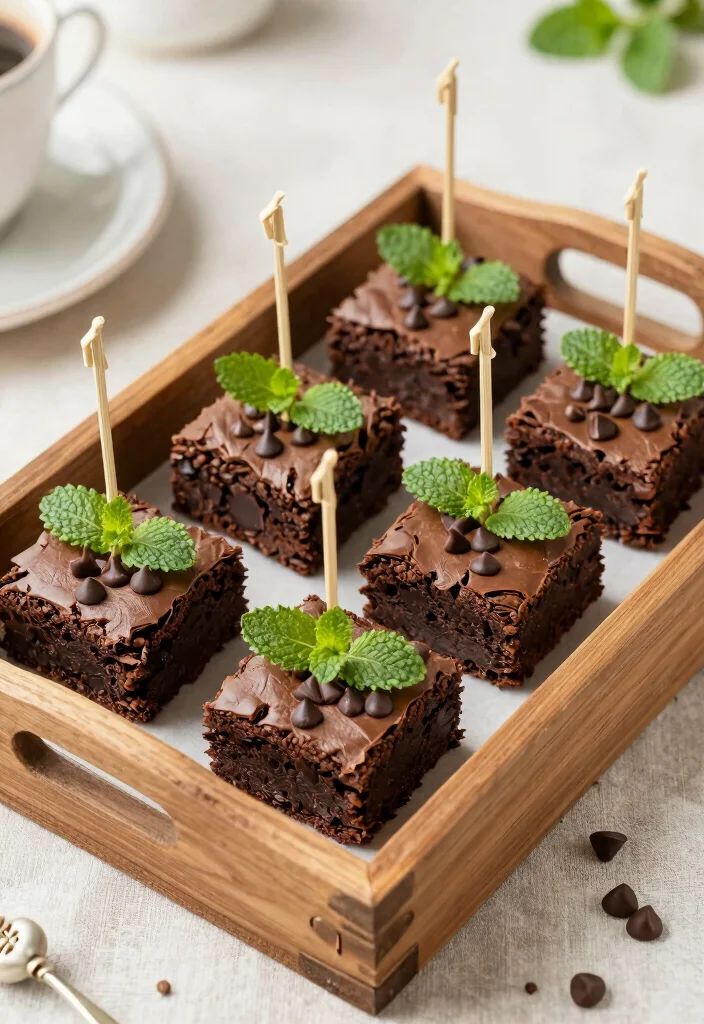
Eager to make your brownie photography pop? Explore unique serving styles to captivate your audience. Consider serving brownies on skewers, in cupcake forms, or even as brownie bites in decorative boxes.
These creative presentations not only add visual interest but also invite people to imagine how they’d enjoy the brownies. Don’t be afraid to play with your presentation and think outside the box for styling.
– Tip: Colorful wrappers or inserts can add even more appeal.
– Unique Insight: Experimenting with different shapes or molds can create unique brownie forms.
– Props: Vintage trays or wooden boards can serve your treats beautifully.
Recipe Overview:
– Servings: 12
– Prep Time: 15 minutes
– Cook Time: 30 minutes
– Total Time: 45 minutes
– Calories: Approx. 240 per serving.
Nutrition Information:
– Calories: 240
– Protein: 4g
– Carbohydrates: 35g
– Fat: 11g
Ingredients:
– 1 cup gluten-free flour
– 1/2 cup cocoa powder
– 1/2 cup monk fruit sweetener
– 1/4 cup coconut oil
– Chocolate chips for decoration.
Instructions:
1. Preheat the oven to 350°F (175°C).
2. Mix all ingredients until combined and pour into a greased dish.
3. Bake for 25-30 minutes and allow to cool.
4. Cut into shapes or serve creatively as desired.
Use colorful skewers for a fun and playful presentation.
Conclusion
Embracing a dark, moody aesthetic in brownie photography opens up endless creative possibilities. The ideas presented not only enhance the visual appeal of your decadent vegan brownies but also encourage experimentation and personalization in styling.
As you explore these concepts, don’t shy away from adding your unique twist. Perfecting your brownie photography could lead to indulgent treats that attract attention and inspire others to appreciate the art of dessert styling.
Frequently Asked Questions
What are essential tips for brownie photography food styling to achieve a dark moody aesthetic?
To nail brownie photography food styling with a dark moody aesthetic, start with a clear concept and mood board focused on deep shadows and rich textures.
Choose a dark background (charcoal, black slate) and matte props to let the brownie take center stage. Use controlled, directional light—window light or a small softbox—to highlight crackled edges and fudgy interior without washing out the scene. In post-processing, boost contrast, deepen shadows, and add a touch of warmth to enrich the brownie photography food styling vibe. Finally, tell a tiny story in the frame—like a bite taken or a glossy drizzle—that feels indulgent and editor-ready for dark chocolate desserts and vegan-friendly setups.
How can I style vegan brownies to look glossy and appealing in moody lighting?
Styling vegan brownies to look glossy in moody lighting starts with the finish. Create a thin, glossy vegan ganache or caramel drizzle to crown the brownie—glossy tops catch light beautifully in moody scenes. Plate on a dark, reflective surface or drizzle the glaze onto a neutral plate to capture highlights without glare. Shoot with side lighting to emphasize crumb texture, and keep fill light subtle to preserve deep shadows. For dessert styling tips, keep the presentation simple yet creative with a sprinkle of flaky salt, a mint leaf, or a fruit shard to hint at flavor.
What lighting setup works best for dark chocolate desserts in brownie photography?
Lighting setups that work best for dark chocolate desserts in brownie photography include: 1) natural window light with a flag or diffuser to soften harsh sun and create directional shadows; 2) a small, diffused key light from the side plus a bounce card for gentle fill; 3) a controlled strobe or LED with a grid to sculpt edges while leaving deep mood in the background. Use a low color temperature to emphasize rich browns, but avoid over-warming. Keep the background dark and let the brownie glow; this aligns with moody food photography principles and brownie photography food styling.
How can I create creative brownie presentation ideas for dessert styling tips?
Get creative with brownie presentation using dessert styling tips that prioritize texture and storytelling. Try stacks, bite-size squares on a slate or wooden board, or a sliced cross-section propped against a mug to reveal inner crumb. Add contrast with a glossy glaze, a smear of vegan chocolate sauce, or a fruit compote for color pops. Use negative space, crowning props like a simple coffee cup, and keep the palette cohesive with deep browns, creams, and charcoal to support creative brownie presentation and food aesthetics ideas.
What props and color palettes boost food aesthetics ideas in brownie photography?
When choosing props and color palettes, lean into food aesthetics ideas that support a dark moody look. Opt for deep browns, charcoal, cream, and metallic accents like gold leaf sparingly. Props: textured linen, charcoal or slate boards, matte ceramic plates, and minimal greenery for contrast. Keep backgrounds uncluttered so the brownie remains the star of brownie photography food styling and moody food photography shots.
Related Topics
brownie photography
dark moody aesthetic
vegan desserts
food styling tips
moody food photography
creative presentation
gourmet brownies
dessert aesthetics
advanced food styling
dark chocolate desserts
food photography techniques
culinary art